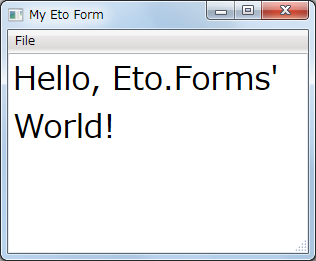
Eto.Formsで設定ダイアログ
今回は、モーダルダイアログを作ってみます。
- メインウインドウは、TextAreaが1つあるだけ
- 設定ダイアログは、メニューから開く
- 設定項目は、TextAreaの中身(文字列)
- メイン側ではTextAreaは
ReadOnly=trueとして変更は禁止
作るもの
メインウインドウと、設定ダイアログからなるアプリケーションです。

モデルクラスの作成
まずは、モデルとして設定クラスを作成します。
using System.ComponentModel;
using System.Runtime.CompilerServices;

namespace EtoSample06
{
    public class AppConfig : INotifyPropertyChanged
    {
        public static AppConfig Instance = new AppConfig();

        private string _message;
        public string Message {
            get { return _message; }
            set { TrySetProperty(ref _message, value); }
        }

       #region コンストラクタなど

        public AppConfig()
        {
            Message = "Hello, World!";
        }

       #endregion

       #region VMの基礎

        public event PropertyChangedEventHandler PropertyChanged;

        protected void RaisePropertyChanged(
          [CallerMemberName] string propertyName = null)
        {
            if (PropertyChanged == null) return;
            PropertyChanged(this, new PropertyChangedEventArgs(propertyName));
        }

        protected bool TrySetProperty<T>(
          ref T storage,
          T value,
          [CallerMemberName] string propertyName = null)
        {
            if (object.Equals(storage, value)) return false;
            storage = value;
            RaisePropertyChanged(propertyName);
            return true;
        }

       #endregion
    }
}
「VMの基礎」領域は前々回と同様です。
本質的には、string Messageプロパティがあるだけの、簡単なものです。
Messageが空だと動作が分かりにくいので、デフォルト値も設定しています。
メインウインドウを仮作成
設定ダイアログ関連の処理はダミーです。
using System;
using Eto.Forms;
using Eto.Drawing;

namespace EtoSample06
{
    public class MainForm : Form
    {
        TextArea message = new TextArea
        {
            Font = new Font(SystemFont.Default, 24F),
            ReadOnly = true,
        };

        public MainForm()
        {
            Title = "My Eto Form";
            ClientSize = new Size(300, 200);

            message.DataContext = AppConfig.Instance;
            message.TextBinding.BindDataContext((AppConfig c) => c.Message);

            Content = new StackLayout
            {
                Items = { new StackLayoutItem {
                    Control = message,
                    Expand = true,
                    HorizontalAlignment = HorizontalAlignment.Stretch,
                    VerticalAlignment = VerticalAlignment.Stretch,
                } },
            };

            var configCommand = new Command { MenuText = "&Preferences..." };
            configCommand.Executed += MessageBox.Show("Config");

            var quitCommand = new Command { MenuText = "E&xit" };
            quitCommand.Executed += (sender, e) => Application.Instance.Quit();

            Menu = new MenuBar
            {
                Items =
                {
                    new ButtonMenuItem { Text = "&File", Items = { } },
                },
                ApplicationItems =
                {
                    new ButtonMenuItem(configCommand),
                },
                QuitItem = quitCommand,
            };
        }
    }
}
コードによるデータバインド
公式に、Eto.Formsにおけるデータバインドの説明があります。
コントロールに対するデータバインドは、大別すると「直接」「コンテキスト経由」の2種類があります。
- 直接:バインド対象のインスタンスを直接バインド時に指定する。主なメソッドは
Bind - コンテキスト経由:バインド対象のインスタンスは、コントロールなどの
DataContextプロパティで指定し、バインドはインスタンス抜きで指定。主なメソッドはBindDataContext
普通使うのは後者でしょう。
// テキストボックスへのバインド例
var text = new TextBox();

// 主要項目は専用プロパティが利用可能。
// ViewModelクラスは適当なものが存在する前提。
// vmは仮引数。
text.TextBinding.BindDataContext(
    (ViewModel vm) => vm.Text
);

// 主要項目以外のバインドの例
// tはTextBox型の仮引数。ViewModel,vmは先と同様。
text.BindDataContext(
    t => t.Wrap,
    (ViewModel vm) => vm.Wrap
);
text.BindDataContext(
    t => t.Font,
    (ViewModel vm) => vm.Font
);
StackLayoutItemで細かいレイアウトを制御
さて、設定ダイアログの見た目についても少し考えてみます。
StackLayoutは、とりあえず要素を放り込むには楽なコンテナです。特にラベルは文字列を自動変換してくれますし。
しかし、もう少し細かく挙動を制御したい場合もあるでしょう。
- コンテナ全体に自動で広げたい
- 固定幅(または固定高さ)要素以外の全領域を埋めたい
その場合は、StackLayoutの要素(Itemsの中身)は StackLayoutItem を選ぶ必要があります。
- Control:言うまでもなく中身。コンテナ指定も可能
- Expand:自分たちが縦並びなら縦、横並びなら横へ、自動的に広がる
- HorizontalAlignment:自分たちが縦並びな場合の、当該要素の横配置を決める。
Stretchは横全体に広げるということ。横並びの場合は無視される - VerticalAlignment:自分たちが横並びな場合の、当該要素の縦配置を決める。
Stretchは縦全体に広げるということ。縦並びの場合は無視される
なお、StackLayoutのデフォルトは縦並びなので、今回のVerticalAlignment指定は無意味です。
全体としては、今回の指定は「TextAreaをコンテナいっぱいに広げる」という意味になります。
Menuクラスの特殊アイテム
Eto.Formsのテンプレートでは、メニュー定義も含まれます。 そのメニューバー(MenuBarクラス)には、やや特殊な項目があります。
- ApplicationItems
- AboutItem
- QuitItem
他にもEtoのMenuBarクラスには、特殊なメニュー項目用のプロパティがあります。 その辺は、公式のMenuBar Classを見るといいでしょう。
これらの特殊項目は、プラットフォーム別(主にmacOS)の対応のためにあります。
ちなみに、現状(2.3)では、MenuBar.Itemsに「File」という名前の項目がないと、Linux上では落ちてしまいます。 また、Windows上では、ApplicationItemsやQuitItemが存在する場合は自動的に「File」が作られてしまいます。 あくまで「File」であって「ファイル」では代用にならないので、修正されるまでは注意が必要です。
アプリケーション設定をどう組み込むか
設定ダイアログに期待される動作は次のものとします。
- 表示時は、その時点での設定を反映している
- OKボタンとキャンセルボタンがある
- OKボタンを押すと、ダイアログは消えて、その時点で設定変更が反映される
- キャンセルボタン、またはウインドウを閉じるボタンを押すと、ダイアログは消えて、設定変更は破棄される
今回は、次の方法で実装することとします。
- ダイアログのコンストラクタは、設定インスタンス(非null)を受け取る
- デフォルトコンストラクタはなし
- OKボタンによる設定の反映は、ダイアログ内で行う
- 呼び出し側は、単にダイアログを表示するだけ
この方法だと、「適用」ボタンの追加も比較的簡単です。
なお、「キャンセル可能」にするのであれば、設定クラスには次の機能がほしいところです。
- クローン生成(設定ダイアログを表示する時の状態をバックアップするため)
- 内容の代入(設定ダイアログで行った結果を実際の設定に反映するため)
設定の反映は、特にGUIに関しては、データバインドを使えば自動反映できます。 今回はメインウインドウで既にそういう作りなので、特に何もする必要はありません。
設定クラスへの機能追加
先ほどのAppConfigクラスに、Clone と Set という2つのメソッドを追加しました。
using System;
using System.Collections.Generic;
using System.Linq;
using System.Text;
using System.Threading.Tasks;
using System.ComponentModel;
using System.Runtime.CompilerServices;

namespace EtoSample06
{
    public class AppConfig : INotifyPropertyChanged
    {
        private string _message;
        public string Message {
            get { return _message; }
            set { TrySetProperty(ref _message, value); }
        }

       #region コンストラクタなど

        public AppConfig()
        {
            Message = "Hello, World!";
        }

        public AppConfig Clone()
        {
            return new AppConfig { Message = this.Message };
        }

        public void Set(AppConfig c)
        {
            Message = c.Message;
        }

       #endregion

       #region VMの基礎

        public event PropertyChangedEventHandler PropertyChanged;

        protected void RaisePropertyChanged(
          [CallerMemberName] string propertyName = null)
        {
            if (PropertyChanged == null) return;
            PropertyChanged(this, new PropertyChangedEventArgs(propertyName));
        }

        protected bool TrySetProperty<T>(
          ref T storage,
          T value,
          [CallerMemberName] string propertyName = null)
        {
            if (object.Equals(storage, value)) return false;
            storage = value;
            RaisePropertyChanged(propertyName);
            return true;
        }

       #endregion
    }
}
設定ダイアログの実装
メソッドを追加したAppConfigを前提に、設定ダイアログを作ります。
using System;
using Eto.Forms;
using Eto.Drawing;

namespace EtoSample06
{
    public class ConfigDialog : Dialog
    {
        TextArea message = new TextArea { };
        Button okButton = new Button { Text = "OK" };
        Button cancelButton = new Button { Text = "キャンセル" };

        public AppConfig Config
        {
            get { return _config; }
            protected set
            {
                _configOriginal = value;
                _config = value?.Clone();
            }
        }
        private AppConfig _config;
        private AppConfig _configOriginal;

        public ConfigDialog(AppConfig c)
        {
            if (c == null) throw new ArgumentNullException();
            Config = c;
            ClientSize = new Size(250, 150);

            message.DataContext = Config;
            message.TextBinding.BindDataContext((AppConfig v) => v.Message);

            okButton.Click += (s, e) => {
                _configOriginal.Set(_config);
                Close();
            };
            cancelButton.Click += (s, e) => Close();

            Content = new StackLayout
            {
                Orientation = Orientation.Vertical,
                Padding = 4,
                Items = {
                    new StackLayoutItem
                    {
                        Control = message,
                        Expand = true,
                        HorizontalAlignment = HorizontalAlignment.Stretch,
                        VerticalAlignment = VerticalAlignment.Stretch
                    },
                    new StackLayoutItem
                    {
                        Control = new StackLayout
                        {
                            Orientation = Orientation.Horizontal,
                            Items= {okButton , cancelButton},
                        },
                        HorizontalAlignment = HorizontalAlignment.Right,
                    },
                },
            };

            DefaultButton = okButton;
            AbortButton = cancelButton;
        }
    }
}
Dialogクラス
今回のConfigDialogクラスは、Eto.Forms.Dialog を継承しています。
モーダルダイアログ用のクラスです(モードレスダイアログはForm)。
中身は、MainFormのテンプレートと似ています。
GUI構築はコードで行っており、先述したデータバインドやStackLayout内の配置指定を使っています。
Dialogクラスの特殊なプロパティもあります。
- DefaultButton:Enterキーと連動するボタン
- AbortButton:Escapeキーと連動するボタン
いずれも設定しなければ、当該キーを押しても処理されません。
また、今回のようにダイアログにTextAreaがある場合、Enterキーは通常はTextArea内での改行となるため、DefaultButtonの設定はあまり意味がありません。
なお、ダイアログが特定の値を返す前提であれば、DialogShowModalメソッドがT型の戻り値をもつようになります。
例えば「TextBoxで文字列を入力するダイアログ」などで有効でしょう。
「右下」配置をStackLayoutの入れ子で
ダイアログでは右下に「OK」「キャンセル」ボタンが並ぶのが定番ですが、右寄せのためStackLayoutの入れ子を使っています。 次にソース中の該当部分(一部割愛)を示します。
Content = new StackLayout
{
    Items = {
        new StackLayoutItem { Control=message },
        // 下段(OK/キャンセルボタン)
        new StackLayoutItem
        {
            // 下段のボタンたちを含むStackLayout
            Control = new StackLayout
            {
                Orientation = Orientation.Horizontal,
                Items= {okButton , cancelButton},
            },
            HorizontalAlignment = HorizontalAlignment.Right, // 右寄せ指定
        },
    },
};
Eto.FormsのTableLayoutには、HTMLのrowspan,colspanのような「複数のセルをまたぐ配置」がないため、ダイアログを作る場合はStackLayoutの方が無難でしょう。
なお、実際には設定ダイアログでの「OK」「キャンセル」の並びは様々です。 調べた範囲では、次の傾向がありました。
...Windowsやmacはともかく、KDEとGnomeの識別は難しそうです。 それをふまえつつ順序を入れ替えやすくするには、2つのボタンを別変数(button1,button2など)から参照し(ここで並び順を制御)、その名前で配置するとよさそうです。
メインフォームから設定ダイアログを呼び出す
メニュー選択時にダイアログを生成、表示するだけです。 設定変更はダイアログ側で勝手にやってくれます。
using System;
using Eto.Forms;
using Eto.Drawing;

namespace EtoSample06
{
    public class MainForm : Form
    {
        AppConfig config = new AppConfig();

        TextArea message = new TextArea
        {
            Font = new Font(SystemFont.Default, 24F),
            ReadOnly = true,
        };

        public MainForm()
        {
            Title = "My Eto Form";
            ClientSize = new Size(300, 200);

            message.DataContext = config;
            message.TextBinding.BindDataContext((AppConfig c) => c.Message);

            Content = new StackLayout
            {
                Items = { new StackLayoutItem {
                    Control = message,
                    Expand = true,
                    HorizontalAlignment = HorizontalAlignment.Stretch,
                    VerticalAlignment = VerticalAlignment.Stretch,
                } },
            };

            var configCommand = new Command { MenuText = "&Preferences..." };
            configCommand.Executed += (s, e) => {
                var dialog = new ConfigDialog(config);
                dialog.ShowModal();
            };

            var quitCommand = new Command { MenuText = "E&xit" };
            quitCommand.Executed += (sender, e) => Application.Instance.Quit();

            Menu = new MenuBar
            {
                Items =
                {
                    new ButtonMenuItem { Text = "&File", Items = { } },
                },
                ApplicationItems =
                {
                    new ButtonMenuItem(configCommand),
                },
                QuitItem = quitCommand,
            };
        }
    }
}
動作サンプル
アプリケーションを動かします。 FileメニューのPreferences...から、設定ダイアログが開けます。

中身を変更してOKボタンを押すと、メインウインドウ側の内容が変わります。

もちろん、キャンセルボタンや右上のウインドウを閉じるボタンを押した場合は、内容は変わりません。